Configuring custom domain
Handling SPF, DKIM and DMARC profiles
If you do not configure a custom domain on your tenant, then you use Upodi's domain for email sending. If that is the case Upodi is responsible for email delivery and you do not have to consider any configuration on your domain etc.
Using a Custom Domain
Step 1: Register your domain
If you want to configure Upodi to send out on your behalf, you have to first register your domain on the Upodi platform here in the domain section of marketing. The email providers always suggest using subdomains in general for email sending fx. invoice.upodi.com.
Important
If you want to send from for example
[email protected]provide the full domain nameinvoice.upodi.comand don't include the address-part ( ex. 'noreply@'). You will define the local part of the domain in the Upodi settings when you add it to your templates.
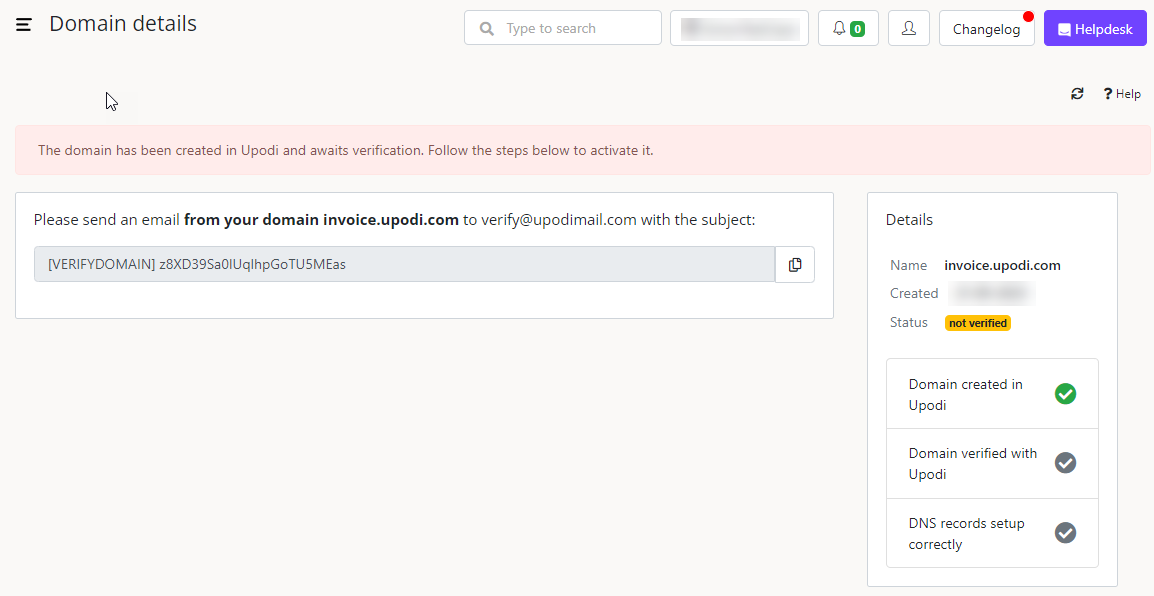
Step 2: Send an email from the domain to Upodi
You will be required to send an email from the domain you registered in Step 1 to the Upodi email [email protected] with a specific code in the subject field.

Remember to insert it into the subject field and leave the body empty.
Verification require the same sender address
Then sending an email to verify the domain, you must send an email from an address equal to the domain to complete the verification. Example sending an email from
[email protected]to verifyinvoice.upodi.comwill not work. You will have to send an email from[email protected]for the verification to complete. Alternate path is to contact helpdesk to manually verify the domain.
Step 3: Setup DNS-records on the domain
Once this is done you will see some DNS-records that you will have to install on your domain in order to verify ownership of the domain. Once these are correctly installed the domain will be verified and useable as the sender email of email communication going out from the Upodi platform.
What is DMARC?
DMARC (Domain-based Message Authentication, Reporting and Conformance) record is a type of DNS record such as SPF, CNAME, MX, DKIM, etc.
DMARC (if configured with policy) is used to inform the email receiving server whether or not to accept an email from a particular sender. The email receiving server will check for the policy and decide on whether to allow the email to the users' inbox or to discard it. It validates the From address given in the email sent by verifying it with the domain providers DMARC policy.
For more information, visit https://dmarc.org/.
TXT-type changes (Required)
Two changes are required in your TXT-type records, while there are also some MX-type and CNAME-type changes, which are optional. We will cover the required ones here.
SPF-record
The first SPF-record is a record with the name of your hostname, so this would be the same domain as you've created for the domain. Fx. upodi.com. If you have no SPF-record today the SPF-record contents should look like this:
v=spf1 include:mailgun.org ~all
If you already have an SPF-record and want to include the mailgun alongside other includes, merge it like this:
v=spf1 include:zoho.eu include:mailgun.org ~all
Public key SPF-record
You also need to include a TXT-record containing your public key. This is another TXT-file with the name of email._domainkey.your-domain.com where you once again insert the chosen domain instead of your-domain.com. The contents of this record would look something like this:
k=rsa; p=MAGyMA0GFSqGSIb3DQEBAQUAA4GNADCBiQKBgQC42JSaOGmME/Z90rl9AxV6SAjXPcdtvayRtNdKgN43EG2/GxjCYndOCuZzG2BkB2e0hNCA1lP952Dv0+I+gjwSBa4Ml60yNaJgR3FgNcH0wQ2d8C6dCP+R15LtjD3wo5IEP3exMB/niWYzt+UKnTGtv+48bY0giiEL4g3UUnoQNwIDAQAB
Please be aware if you copy this value from somewhere that the contents match the key exactly and that there are no white spaces or line breaks copied to the contents.
Step 4: Add it to your email template
Add the domain to your email template in the template section, and we will automatically start sending emails from that domain.
Updated over 1 year ago
